

Overview
BoldCreate provides intelligent AI-powered assistance for C++ development, helping you write, debug, and optimize C++ code faster. Whether you’re building system applications, game engines, or performance-critical software, BoldCreate’s AI features work alongside your C++ compiler to enhance your productivity.
This guide walks you through setting up a complete C++ development environment—from installing compilers to writing your first AI-assisted C++ program. Once configured, you’ll be able to leverage BoldCreate’s autocomplete, debugging assistance, code explanations, and smart refactoring for all your C++ projects.
Prerequisites:
- BoldCreate must be installed. If not, see the installation guide.
- Disk Space: 2-5 GB for compiler installation (Windows: MinGW-w64 ~2GB; macOS: Xcode Command Line Tools ~5GB)
What You’ll Learn
By the end of this tutorial, you’ll learn how to:
- Install and configure a C++ compiler on Windows (MinGW-w64) and macOS (Clang)
- Install and configure CodeLLDB extension for debugging
- Set up build tasks for automatic compilation
- Configure debugging with breakpoints and variable inspection
- Write and run your first C++ program in BoldCreate
Download and Install C++ Compiler
Windows
This guide uses MinGW-w64, which provides the GCC compiler for Windows. It’s lightweight, open-source, and works perfectly with BoldCreate.
Step 1: Download MinGW-w64
-
Download the MSYS2 installer (recommended distribution):
- visit the MSYS2 download page for the latest version
-
Run the installer and follow the installation wizard
-
Install to the default location:
C:\msys64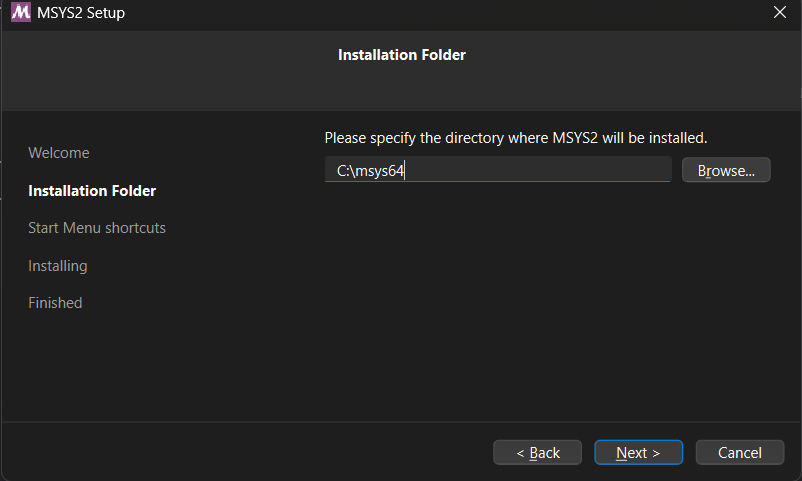
Step 2: Install GCC Compiler via MSYS2
-
Open MSYS2 MSYS from the Start menu
-
Install the compiler toolchain by running:
pacman -S mingw-w64-ucrt-x86_64-gccWait for the installation to complete
Note: When prompted with
:: Proceed with installation? [Y/n], press Y and then Enter to continue.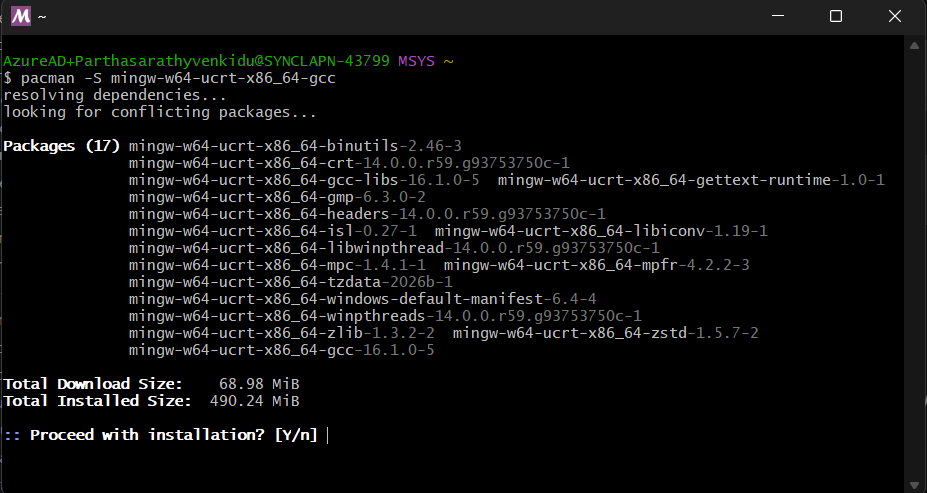
Step 3: Add MinGW to System PATH
-
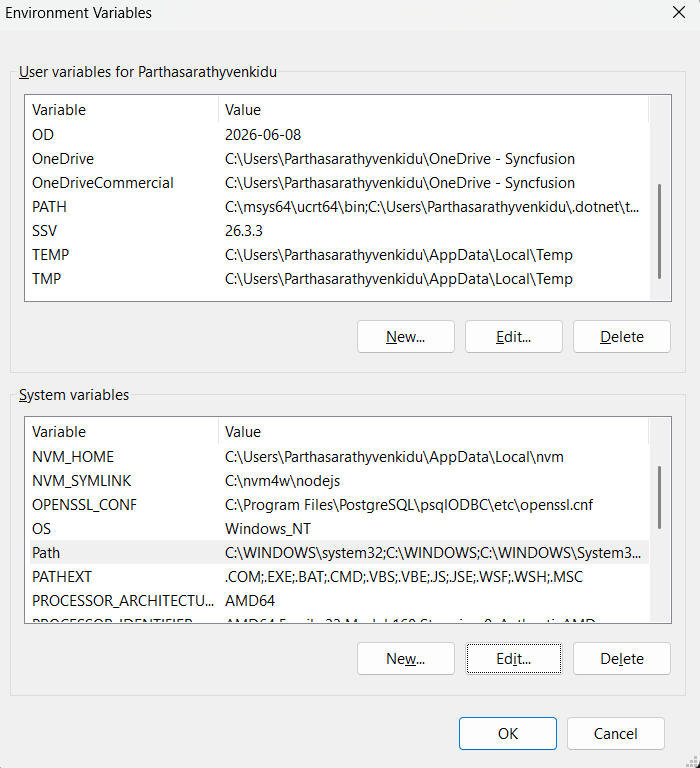
Open Start Menu → search for “Environment Variables” → click Edit the system environment variables
-
Click Environment Variables button
-
Under System variables, find and select Path → click Edit
-
Click New and add:
C:\msys64\ucrt64\bin -
Click OK on all windows to save
Step 4: Verify Installation
-
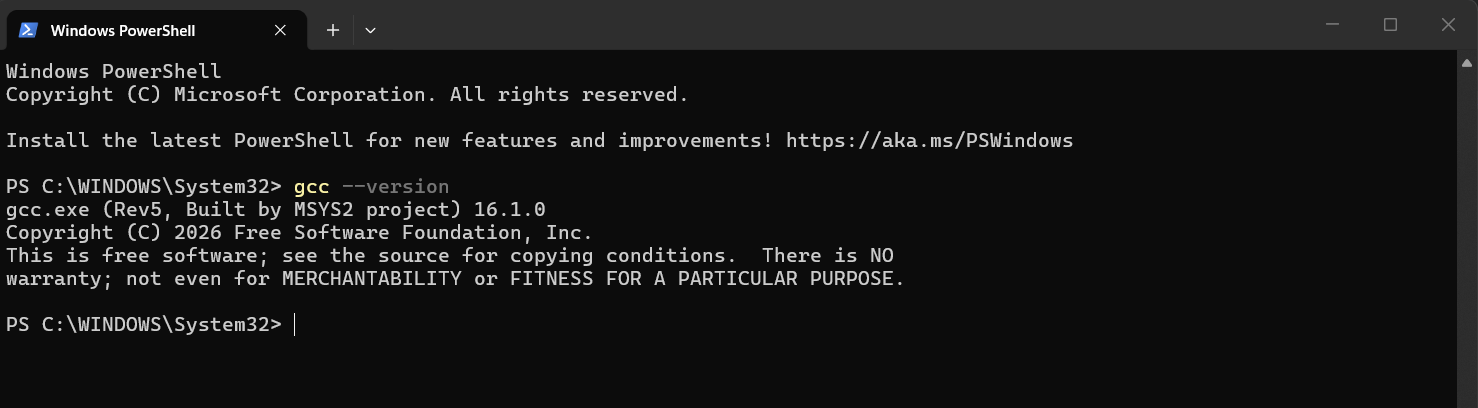
Open a new Command Prompt or PowerShell window
-
Run the following command:
g++ --version -
You should see the GCC compiler version information
macOS
If you’re on macOS, the setup is even simpler. macOS uses Clang (part of LLVM) as its default C++ compiler, which comes with Xcode Command Line Tools.
Step 1: Install Xcode Command Line Tools
- Open Terminal (Applications → Utilities → Terminal)
- Run the following command:
xcode-select --install - This will install the Clang compiler
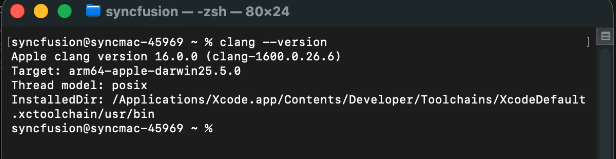
Step 2: Verify Installation
-
In Terminal, run:
clang --version -
You should see the Clang compiler version information
Configure C++ in BoldCreate
With the compiler installed, the next step is to set up BoldCreate to work seamlessly with your C++ environment. This involves installing an extension for debugging and configuring build and debug tasks.
Why Not Use Microsoft’s C/C++ Extension?
BoldCreate is a fork of Visual Studio Code with enhanced AI capabilities. BoldCreate cannot use certain Microsoft proprietary extensions due to licensing restrictions.
Microsoft’s C/C++ extension (
ms-vscode.cpptools) is only licensed for use in official VS Code builds. Attempting to install it in BoldCreate will result in errors or the extension simply won’t function.Solution: We use CodeLLDB instead, which is:
- Open-source and Provides full debugging capabilities (breakpoints, variable inspection, call stacks).
Step 1: Install CodeLLDB Extension
-
Open BoldCreate
-
Click the Extensions icon in the sidebar (or press
Ctrl+Shift+X/Cmd+Shift+X) -
Search for “CodeLLDB” (by vadimcn)

-
Click Install on the extension
Extension Features:
- Native LLDB debugger with full debugging support
- Works seamlessly with MinGW/GCC and Clang
- Advanced breakpoint management
- Variable inspection and watches
- Multi-threaded debugging support
Note: CodeLLDB bundles its own LLDB debugger, so no additional debugger installation is required. It works perfectly with executables compiled by g++ or clang++.
Step 2: Configure Build Task
With CodeLLDB installed, let’s set up a build task so you can compile your C++ code directly from BoldCreate without switching to the command line.
- In your project folder, create a
.vscodefolder if it doesn’t exist - Create a file named
tasks.jsoninside.vscode - Add the following configuration:
Example tasks.json (Windows):
{
    "version": "2.0.0",
    "tasks": [
        {
            "type": "shell",
            "label": "C++: g++ build active file",
            "command": "g++",
            "args": [
                "-fdiagnostics-color=always",
                "-g",
                "${file}",
                "-o",
                "${fileDirname}\\${fileBasenameNoExtension}.exe"
            ],
            "options": {
                "cwd": "${fileDirname}"
            },
            "problemMatcher": [
                "$gcc"
            ],
            "group": {
                "kind": "build",
                "isDefault": true
            },
            "detail": "Compiler: g++"
        }
    ]
}
Example tasks.json (macOS):
{
    "version": "2.0.0",
    "tasks": [
        {
            "type": "shell",
            "label": "C++: clang++ build active file",
            "command": "clang++",
            "args": [
                "-fdiagnostics-color=always",
                "-g",
                "${file}",
                "-o",
                "${fileDirname}/${fileBasenameNoExtension}"
            ],
            "options": {
                "cwd": "${fileDirname}"
            },
            "problemMatcher": [
                "$gcc"
            ],
            "group": {
                "kind": "build",
                "isDefault": true
            },
            "detail": "Compiler: clang++"
        }
    ]
}
Step 3: Configure Debugging with CodeLLDB
Set up the debugger to run and inspect your C++ programs. The debugger will automatically build your code before debugging.
- In your project folder’s
.vscodedirectory, create a file namedlaunch.json - Add the following configuration:
Example launch.json (Windows):
{
    "version": "0.2.0",
    "configurations": [
        {
            "name": "C++: g++ build and debug active file",
            "type": "lldb",
            "request": "launch",
            "program": "${fileDirname}\\${fileBasenameNoExtension}.exe",
            "args": [],
            "cwd": "${fileDirname}",
            "preLaunchTask": "C++: g++ build active file"
        }
    ]
}
Example launch.json (macOS):
{
    "version": "0.2.0",
    "configurations": [
        {
            "name": "C++: clang++ build and debug active file",
            "type": "lldb",
            "request": "launch",
            "program": "${fileDirname}/${fileBasenameNoExtension}",
            "args": [],
            "cwd": "${fileDirname}",
            "preLaunchTask": "C++: clang++ build active file"
        }
    ]
}
Important: The
preLaunchTaskname inlaunch.jsonmust match thelabelin yourtasks.jsonfile. This ensures your code is compiled before debugging starts.
Key Points:
"type": "lldb"tells BoldCreate to use CodeLLDB for debuggingpreLaunchTaskautomatically builds your code before debugging- The configuration works with both debug and release builds
Write Your First C++ Program
Now that everything is configured, let’s put your setup to the test by creating and running a simple C++ program.
Step 1: Create a New C++ File
-
In BoldCreate, create a new file:
hello.cpp -
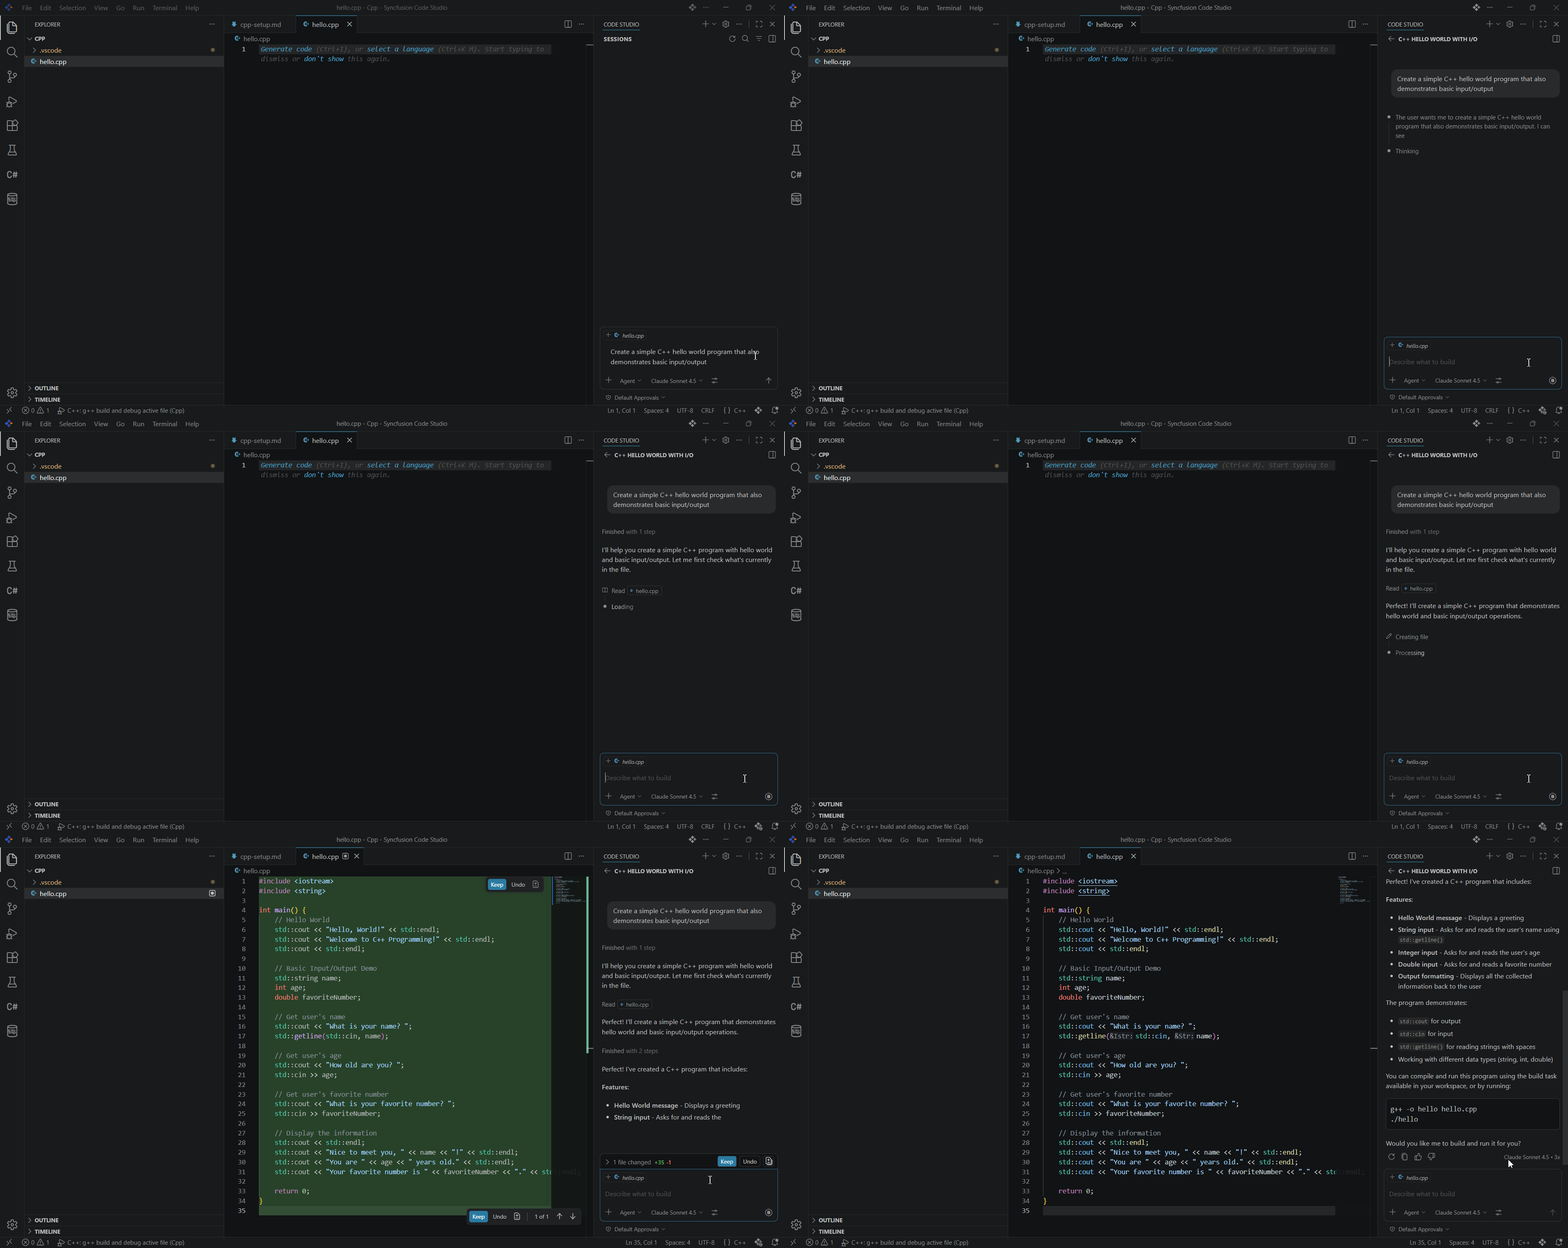
You can write the code yourself or ask BoldCreate to help:
Try this prompt in BoldCreate Chat:
Create a simple C++ hello world program that also demonstrates basic input/output -
BoldCreate will generate a basic C++ code.
Debug Your C++ Code
Debugging is where BoldCreate truly shines. Let’s walk through setting breakpoints and inspecting your program as it runs.
Step 1: Set a Breakpoint
-
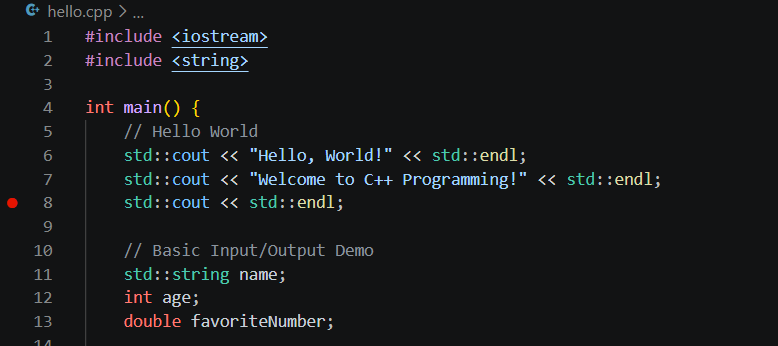
Click in the left margin (line number area) to set a breakpoint
-
A red dot will appear
Step 2: Start Debugging
-
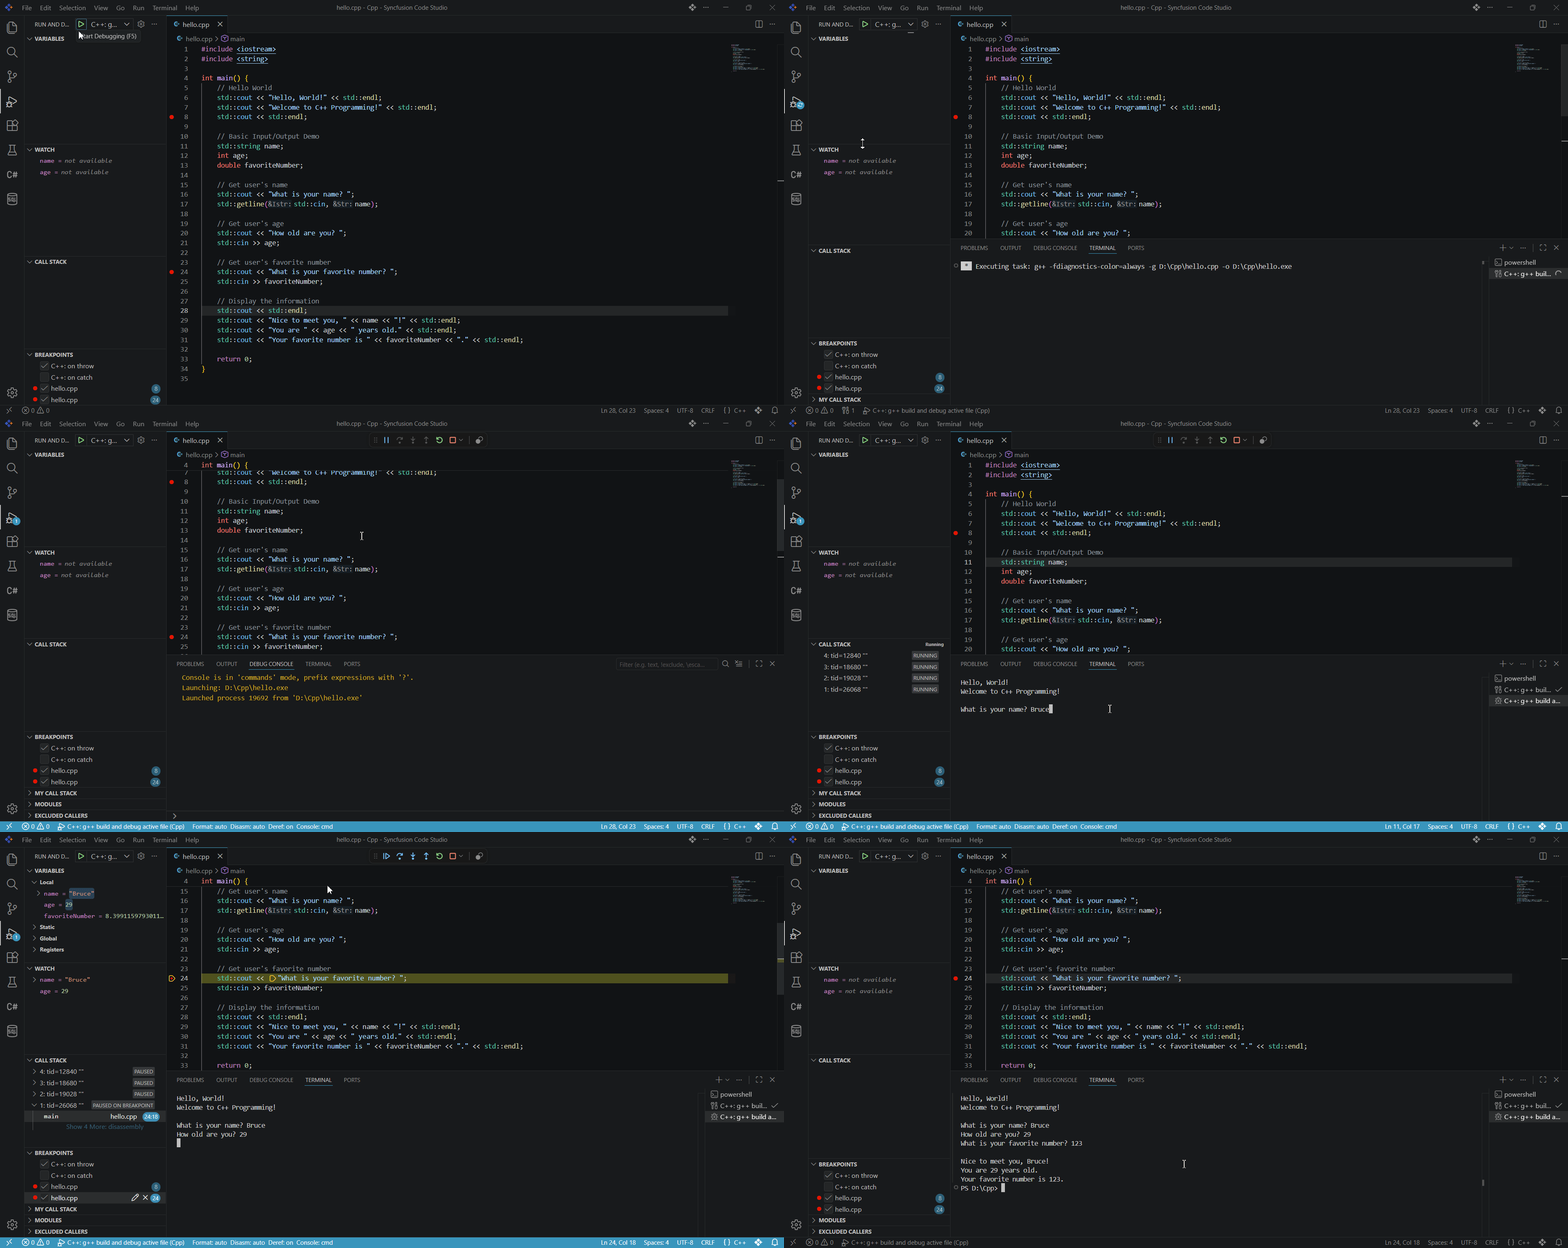
Press
F5to start debugging -
The program will pause at your breakpoint
-
Use the debug toolbar to:
- Continue (
F5) - Step Over (
F10) - Step Into (
F11) - Step Out (
Shift+F11)
- Continue (
-
While debugging, you can:
- View variables in the Variables panel
- Add watch expressions in the Watch panel
- Examine the call stack in the Call Stack panel
Next Steps
Now that Your C++ development environment is now fully configured in BoldCreate. Here’s what you can explore next:
- Build Real Projects: Start developing C++ applications with full debugging support - see tutorials to get started
- Leverage AI Features: Use BoldCreate’s autocomplete, code explanation, and refactoring capabilities to speed up development
- Explore Agent Mode: For complex multi-file projects, try Agent mode for advanced refactoring and architectural improvements
- Learn More: Check out the Quick Start Guide and features overview for additional capabilities
Troubleshooting
Compiler not found after installation:
- Ensure you opened a new terminal window after adding to PATH
- Restart BoldCreate if the terminal was already open
- Verify PATH by running
echo $env:PATH(Windows) orecho $PATH(macOS)
Build task fails:
- Check that your
tasks.jsonfile has the correct compiler command (g++orclang++) - Verify the file paths and ensure there are no typos
- Make sure your compiler is accessible from the terminal
Debugger won’t start:
- Confirm CodeLLDB extension is installed and enabled
- Check that
preLaunchTaskinlaunch.jsonmatches your tasklabelexactly - Ensure your program compiles successfully before debugging