
What you’ll learn
- What an environment is and when to use one
- How to start a cloud task with an environment
- How to find, create, build, edit, share, and delete environments
- What the environment statuses and messages mean
What is an environment?
An environment is a ready-made workspace for cloud tasks. It’s saved once and reused, so every task starts with the same setup.
An environment can include:
- One or more repositories that are copied in at the start of every task.
- The software the project needs, such as a programming language and its tools.
- Commands that run automatically, for example to install the project’s dependencies (the extra software packages a project relies on) or to start a database.
- Settings (called environment variables) that the project and the agent can use.
Use an environment when your project needs more than a single repository, or needs software installed before the agent can work on it. Someone in your team usually sets it up once, and everyone it’s shared with can use it.
Note: Environments are used for Cloud tasks only.
Use an environment in a task
- Click New task in the sidebar.
- Under Start a new task, select Cloud.
- Click the repository button. The list has two sections: Environments and Repositories.
- Under Environments, choose the environment you want. Type in Search repositories and environments… to find it quickly.
- Choose an agent and a model, type your request, and press Enter.
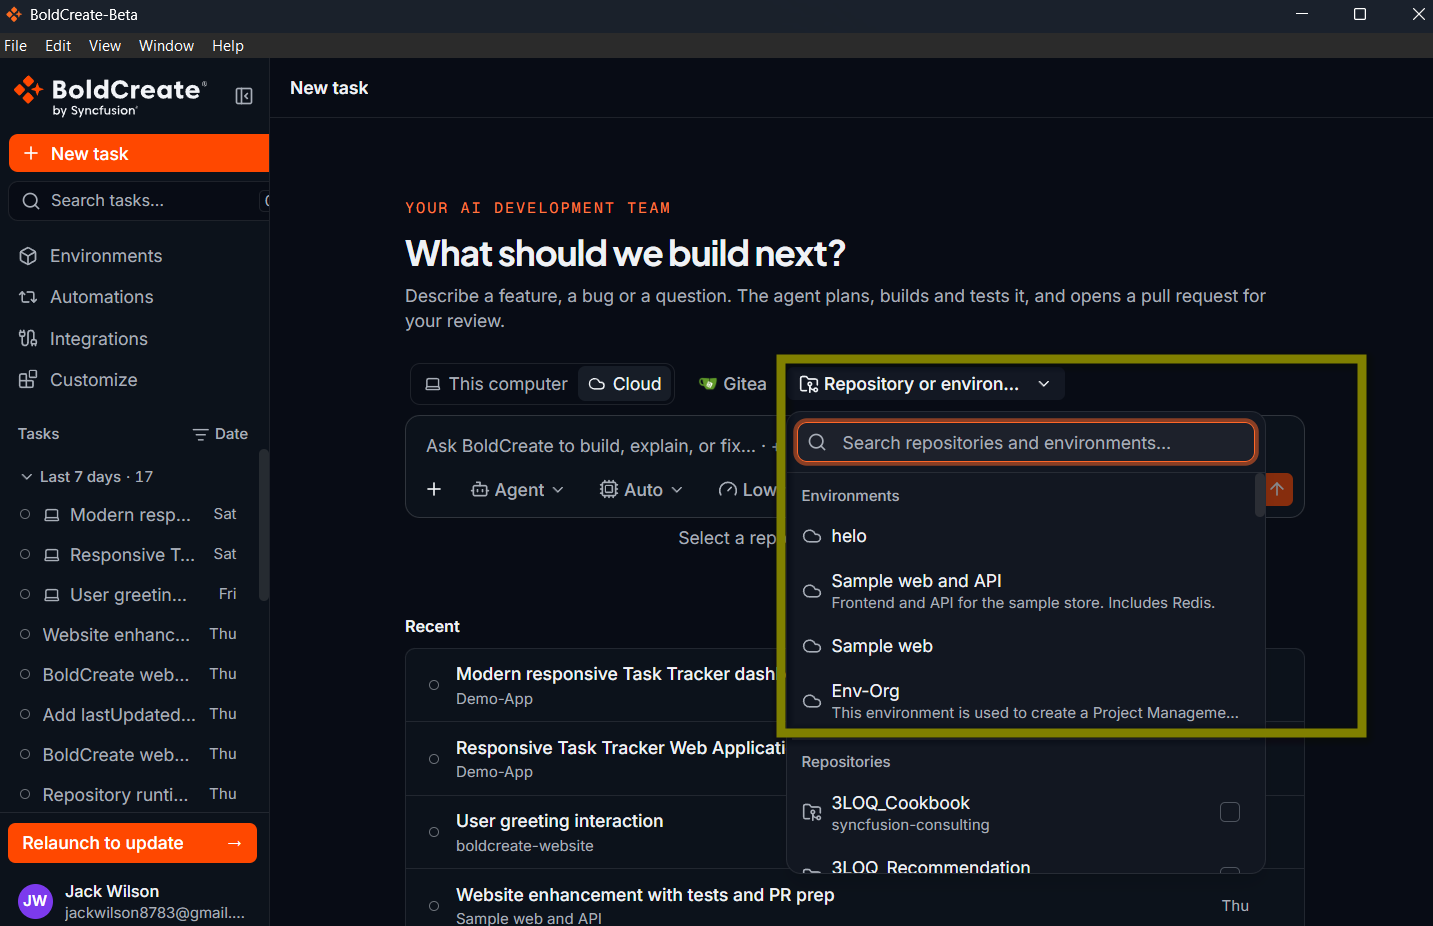
Only environments that are Ready appear in the list. If none are ready, you see “No ready environments”.
Tip: In the sidebar, when tasks are grouped by Repository, tasks that use an environment are grouped under Environment · {name}.
Browse environments
In the sidebar, click Environments. The page lists the environments you can use.
| Control | What it does |
|---|---|
| All / Ready / Building / Failed | Show all environments, or only those with a certain status. |
| Search environments by name | Find an environment by name. |
| Filters | Show only environments Created by me, or by who can use them: Private, Team, or Organization. |
| Refresh environments | Reload the list. |
| Rows | Choose how many environments to show on each page (25, 50, or 100). |
Click an environment to see its details.
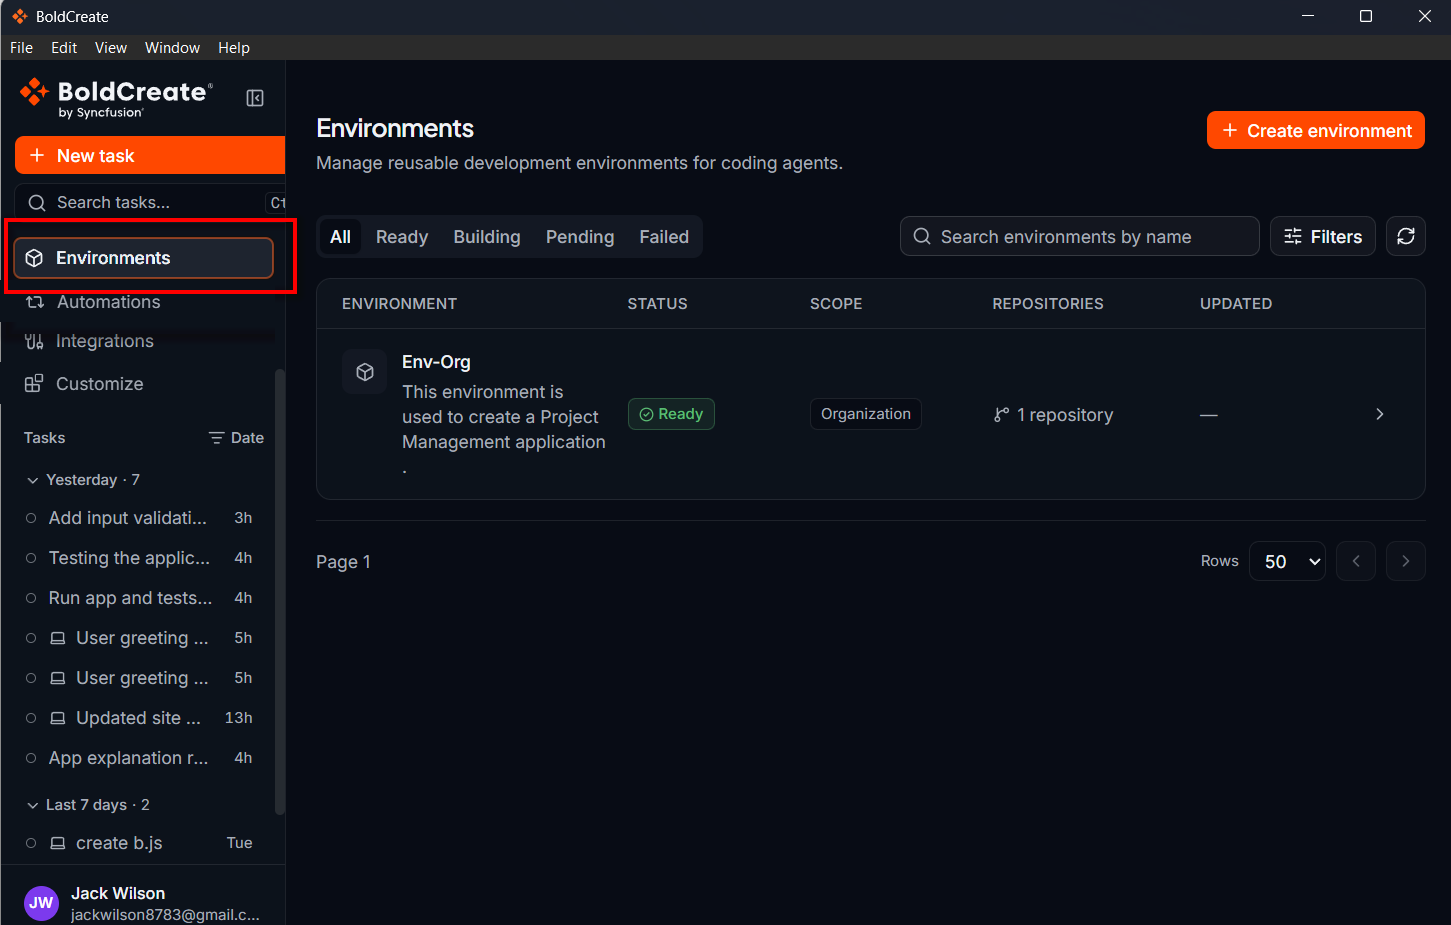
Environment statuses
| Status | Meaning |
|---|---|
| Pending | The environment is saved but hasn’t been built yet. |
| Building | BoldCreate is preparing the environment. This can take a few minutes. |
| Ready | The environment is ready to use in tasks. |
| Failed | Something went wrong while preparing it. Check the build logs. |
View an environment’s details
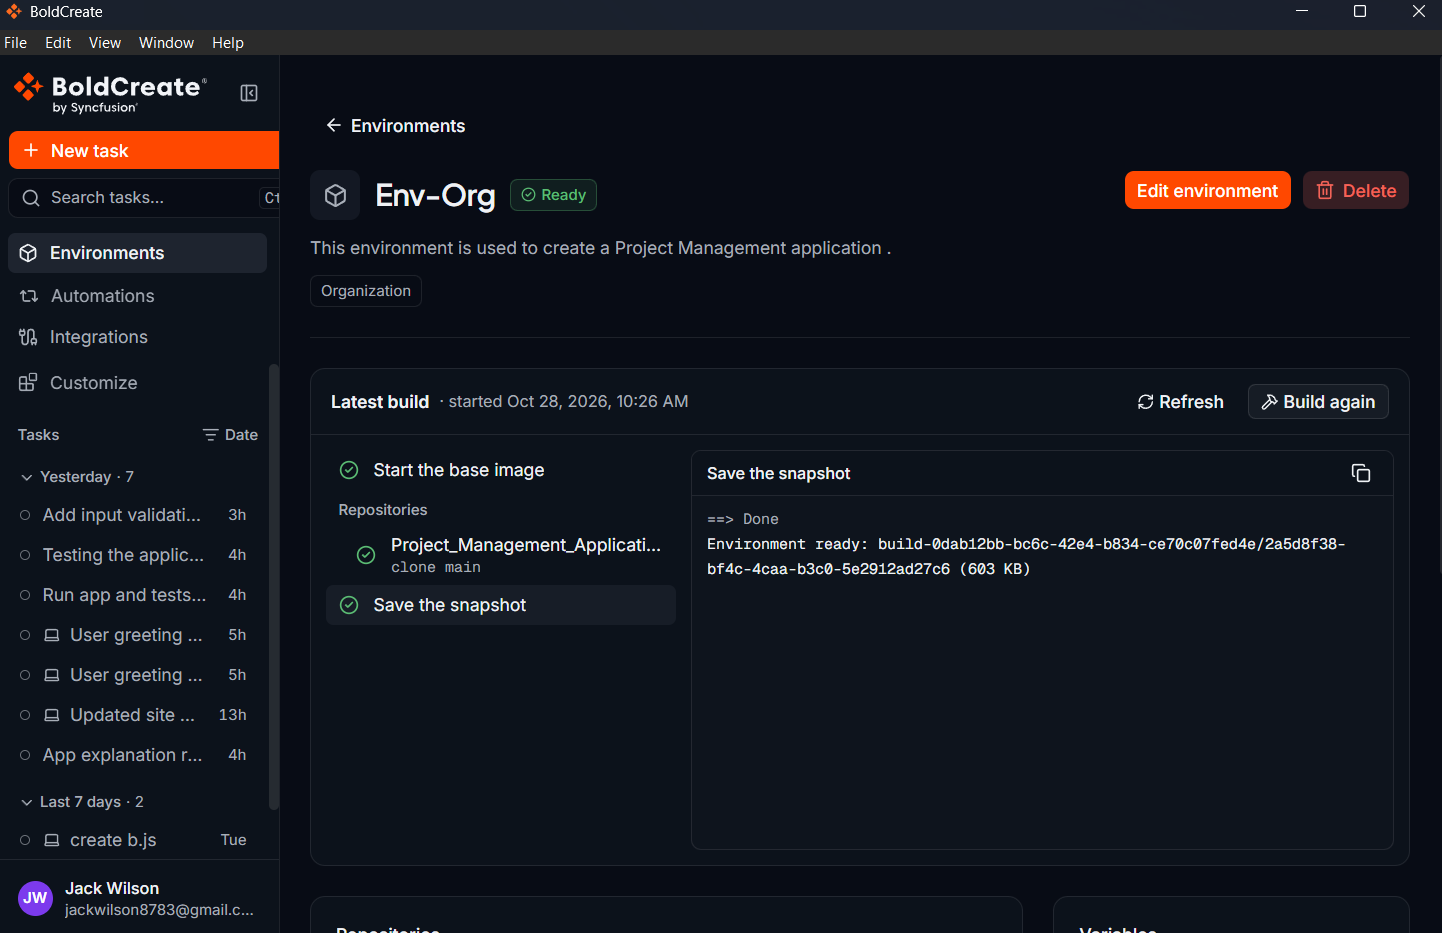
The details page shows:
- Repositories: the repositories that are copied in, their branch, and which one is the Primary repository.
- Commands: the Setup commands (run once when the environment is built) and the Start command (run each time a task starts).
- Runtime: the software setup it’s based on, its computing resources, and how many environment variables are set.
- Activity: who created and last updated it, and when.
You can also click Build logs to see the messages from the latest build. Click Refresh to update them, and Close when you’re done.
Create an environment
Before you start: Connect your Git service (GitHub, GitLab, or Gitea) on the Integrations page. See Run in the cloud.
- On the Environments page, click Create environment.
- Under General configuration, fill in:
- Environment name: a short name that describes the project or purpose, for example “Frontend development”.
- Description (optional): explain what’s included, so others can choose the right environment.
- Under Repositories:
-
In Connected provider, choose your Git service.
-
Choose a Repository and a Branch.
-
(Optional) In Install command, enter the command that installs the project’s dependencies:
npm install -
To add another repository, click Add repository. Select Primary repository on the one that matters most. Click Remove to take one away.
-
- (Optional) Open Advanced configuration to change the software setup, commands, and settings. See the next section. The default settings work for most projects.
- Under Access, choose who can use the environment:
- Private: only you.
- Organization: everyone in your organization.
- Selected teams: only members of the teams you choose. Select at least one team.
- Click Create environment.
BoldCreate saves the environment and opens its details page. You can follow the build progress there. The status changes to Ready when the environment can be used.
Tip: If a step takes a while, you may see “This is taking longer than expected. The request is still in progress; no action is needed.” Just wait.
Advanced configuration
Open Advanced configuration to customize the environment. Under Runtime source, choose how its software is set up:
| Runtime source | What it means |
|---|---|
| Runtime image | “Select a prebuilt image and add optional setup commands.” Pick a ready-made software setup from a list. Best for most people. |
| Dockerfile | “Build from your own Dockerfile for full control over the base image, packages, and tools.” For people who already use Docker. |
Runtime image options
| Field | What to enter |
|---|---|
| Runtime environment | The ready-made software setup to start from. Recommended (use Bold Create preconfigured template) includes common development tools. Click View installed packages to see what’s included. You can also choose a setup for a specific language (such as Node.js, Python, .NET, Go, Java, Ruby, or Rust), or enter another image name. |
| System setup commands (optional) | Commands that run once while the environment is built, one per line, to install extra tools. |
| Start command (optional) | A command that runs each time a task starts, for example to launch a service the project needs. |
| Environment variables (optional) | Settings for the project, one KEY=value pair per line. They’re available to the commands and to the agent. |
Note: “Resources are fixed at 4 CPU cores and 8 GB memory.” You don’t need to choose computing power.
Using a Dockerfile
A Dockerfile is a text file with step-by-step instructions for building a software setup. If you choose Dockerfile:
- Paste your Dockerfile into the editor, click Upload Dockerfile, or drag the file onto the editor.
- New to Dockerfiles? Click Use starter template for a simple example to build on. Click Reset to starter template to start over.
- Click View guide to open the guide to supported instructions and examples.
- The Dockerfile must start with a
FROMline and be 64 KB or smaller. - If BoldCreate finds a problem, it lists the line and what to fix, for example “COPY is not supported. Write files with RUN and a heredoc instead.” Fix the errors, then save again.
Note: With a Dockerfile, System setup commands aren’t used. If you entered some, click Move into Dockerfile to add them to the Dockerfile, or Clear setup commands to remove them.
Build or rebuild an environment
On the details page:
- Build: prepares an environment that hasn’t been built yet.
- Rebuild: prepares it again, for example after a failed build or when the project’s software has changed. “The existing runtime template will be replaced and built again.”
Confirm in the message that appears. While it builds, the page shows Build in progress – “Status refreshes automatically while this page is open.”
Edit or delete an environment
You can edit, build, and delete environments that you created. Administrators can manage all environments.
To edit an environment:
- Open the environment’s details page.
- Click Edit environment.
- Make your changes and click Save changes.
To delete an environment:
- Open the environment’s details page.
- Click Delete.
- In Delete environment?, click Delete environment to confirm. The environment and its saved settings are permanently deleted. This can’t be undone.
Note: Deleting an environment doesn’t change the repositories it used.
Messages you might see
| Message | What to do |
|---|---|
| “Environment name is required.” | Enter a name. |
| “An environment with this name already exists. Choose another name.” | Use a different name. |
| “Connected provider is required.” | Choose your Git service under Repositories. If none are listed, connect one on the Integrations page. |
| “Repository is required.” / “Branch is required.” | Choose a repository and branch, or click Remove on the empty row. |
| “Select at least one team for team access.” | Select a team, or choose a different Access option. |
| “Complete the required fields before saving.” | Fill in the fields marked with an asterisk (*). |
| “Fix the Dockerfile errors before saving.” | Fix the problems listed under the Dockerfile, then save again. |
| “The file is larger than 64 KB. Dockerfiles must be 64 KB or smaller.” | Use a smaller Dockerfile. |
| “Environments could not be loaded” | Click Retry. |
| “No ready environments” (in the task’s repository list) | Wait for an environment to finish building, or create one. |