
Create an environment when the agent needs more than a single repository and branch: extra tools, services that must be running, variables or secrets, or several repositories.
The form has five sections, listed on the left as you scroll:
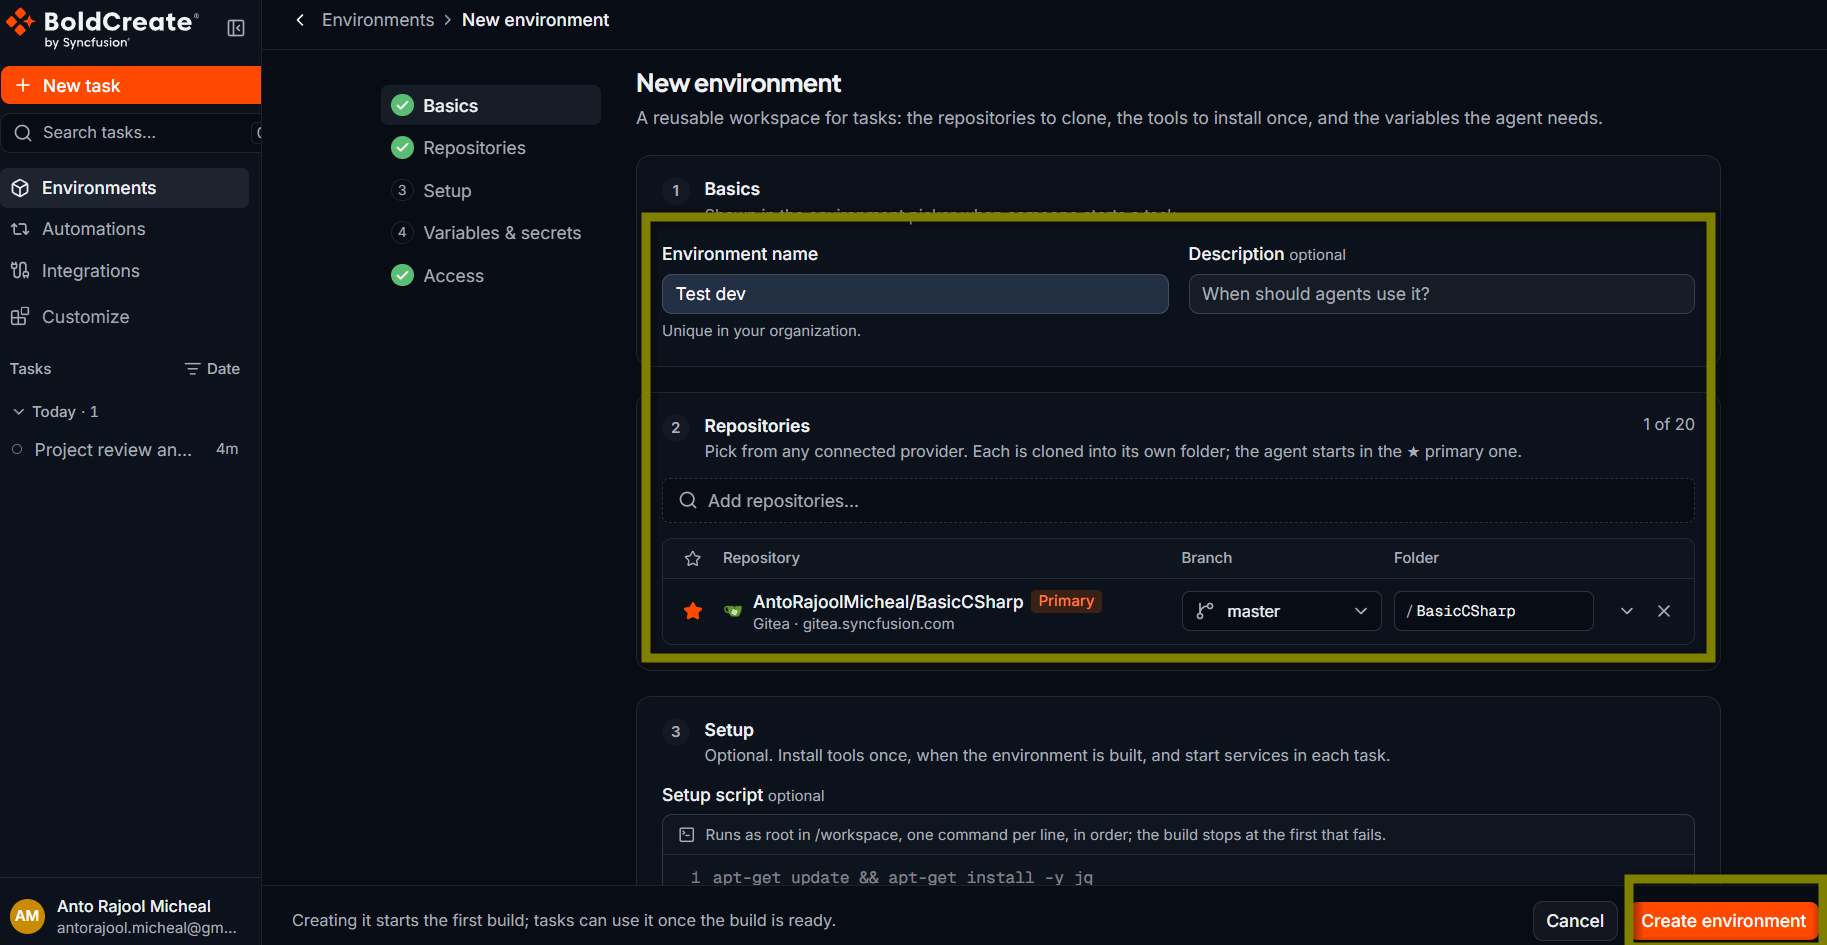
- Basics: the name and description.
- Repositories: the repositories, branches, folders, and install commands.
- Setup: setup commands and a start command.
- Variables & secrets: configuration values and encrypted secrets.
- Access: who can use the environment.
Only the environment name is required. Everything else is optional. An environment with no repositories starts tasks in an empty workspace.
Before you begin
- To add repositories, connect a Git provider that can access them. See Integrations.
- Know the commands your project needs, such as how to install dependencies and which services must be running.
Step 1: Start a new environment
- In the sidebar, select Environments.
- Select Create environment.
Step 2: Name the environment
- Enter an Environment name, for example
Storefront (web + api). It can be up to 100 characters and must be unique in your organization. - Optionally, enter a Description, for example
React app with Playwright for end-to-end tests. It can be up to 2,000 characters. Answer the question “When should agents use it?” for the people who pick environments.
Step 3: Add repositories (optional)
- Select Add repositories…. The list covers every connected provider. Use the provider filter or the search box to narrow a long list.
- Select each repository you want, for example
your-org/sample-app. You can mix repositories from different providers. - For each repository, pick the branch the agent should start from, for example
main. If you don’t pick one, the repository’s default branch is used. - Optionally, change the Folder name, and enter an install command that installs the repository’s dependencies, for example
npm ci. - Select the star (★) next to the repository where most of the work happens. This is the primary repository.
Each repository is cloned into its own folder under the workspace root, and its install command runs there during the build. The folder defaults to the repository name. If two repositories have the same name, the second gets a suffix such as -2. A folder name can have up to 100 characters (letters, digits, ., -, _), and no two repositories can share a folder. The agent starts in the primary repository and can read and change files in all of them.
You can add up to 20 repositories. If you don’t mark a primary repository, the first becomes primary. If you remove the primary, the first remaining one takes over.
Step 4: Setup commands and start command (optional)
Every environment starts from the Bold Create base image: Ubuntu 22.04 with Node.js 22, Python 3, Git, and Playwright. Custom Docker images and Dockerfiles are not supported.
Setup script: enter one command per line, for example:
apt-get update && apt-get install -y jq
npm install -g pnpm
Setup commands run once, as root, in order, while the environment is built. The build stops at the first command that fails. You can use the Add buttons for common tools: pnpm, Yarn, uv, Go, Java, and .NET. Put a repository’s own dependency install in its install command instead.
Start command: for example, docker compose up -d. It runs once in each new task’s workspace, after the repositories are ready. Use it for services the agent needs running. It does not run during the build.
Step 5: Variables and secrets (optional)
Add a row for each value: a name, a value, and a secret switch.
- Variable: a plain value, for example
NODE_ENV=development. It is visible to anyone who can open the environment, and the agent can read it. - Secret: an encrypted value. After saving, it is never shown again. To replace it, enter a new value. A stored secret stays a secret.
Names use letters, digits, and _, and cannot start with a digit. Names must be unique. Variables and secrets are given to a task’s workspace when it starts. They are not part of the build.
You can paste a .env file. Comments and blank lines are skipped, and a name that looks like a credential (for example one containing TOKEN, SECRET, PASSWORD, or API_KEY) is added as a secret. Up to 100 variables are allowed.
Step 6: Choose who can use it
Under Access, select one:
- Private: only you. This is the default.
- Organization: everyone in your organization.
- Selected teams: members of the teams you select. Search for teams and check each one. Select Load more teams if yours is missing. Select at least one team.
Step 7: Save
Select Create environment in the header. Bold Create opens the environment’s details page.
If the environment has setup commands or repositories, it needs a build. The build starts on its own and the status shows Building. When it succeeds, the status changes to Ready and you can use the environment in a task. An environment with neither is Ready as soon as you save it. See Manage environments.
If the environment saves but some secrets don’t, Bold Create opens the edit page and lists the secrets that failed. Enter them again and save.
Reference: fields
| Field | Required | Notes |
|---|---|---|
| Environment name | Yes | Up to 100 characters; unique in your organization. |
| Description | No | Up to 2,000 characters. |
| Repositories | No | Up to 20, from any connected provider. |
| Branch | No | One per repository. Defaults to the repository’s default branch. |
| Folder | Yes (filled in for you) | Defaults from the repository name; up to 100 characters; unique. |
| Install command | No | Runs in the repository’s folder during the build. |
| Primary repository | One, when there are repositories | Where the agent starts working. |
| Setup script | No | One command per line; runs as root during the build. |
| Start command | No | Runs once in each new task’s workspace. |
| Variables and secrets | No | Up to 100. |
| Access | Yes | Private (default), Organization, or Selected teams. |
| Teams | With Selected teams | At least one team. |
Best practices
- Keep setup commands short, since they run at every rebuild.
- Put dependency installs in install commands, so they run in the right folder and are saved in the build.
- Keep the start command fast. It runs at the start of every task.
- Use secrets, not plain variables, for tokens and passwords.
- Name and describe environments clearly, so your team picks the right one.
Troubleshooting
| Problem | What to do |
|---|---|
| A required field is empty or invalid | Look for the red message under Environment name, Repositories (folder names), Variables & secrets, or Access (Selected teams). |
| The name already exists | Names must be unique in your organization. |
| No repositories or branches are listed | Check that the provider is connected. See Repository or branch not listed. |
| A variable name is rejected | Use letters, digits, and _, and don’t start with a digit. A name can’t appear twice. |
| A secret needs a value | Enter a value for each new secret. |
| The build fails | See Environment build failed. |